
Introduction
What is the key to a clean and loud mix?
Is it EQ? Is it compression? Limiting maybe?
To some extent – yes. But in my experience, the biggest game-changer that significantly improved my mixes was focusing on properly gain staging my tracks.
What is gain staging?
Gain staging is the process of managing the level of an audio signal over multiple steps.
For example, a basic recording chain consists of a microphone and a microphone preamp going into a DAW via an audio interface. Like so:
Microphone > Microphone Preamp > Interface > DAW Input
The microphone’s gain can be set or adjusted first on the microphone preamp, and secondly on the audio interface line input. By having multiple steps in the process, we have greater control of a signal’s volume at the recording stage.
Similarly, when mixing in Pro Tools we can control a signal’s gain in the following ways:
- Clip Gain – the gain control of the actual recorded audio clip itself
- Volume Fader – the volume of the channel that the audio clip lives on
- Via Plugin with Gain/Input/Output Controls – the volume of the signal as it passes through the channel and the plugin’s that are on that channel
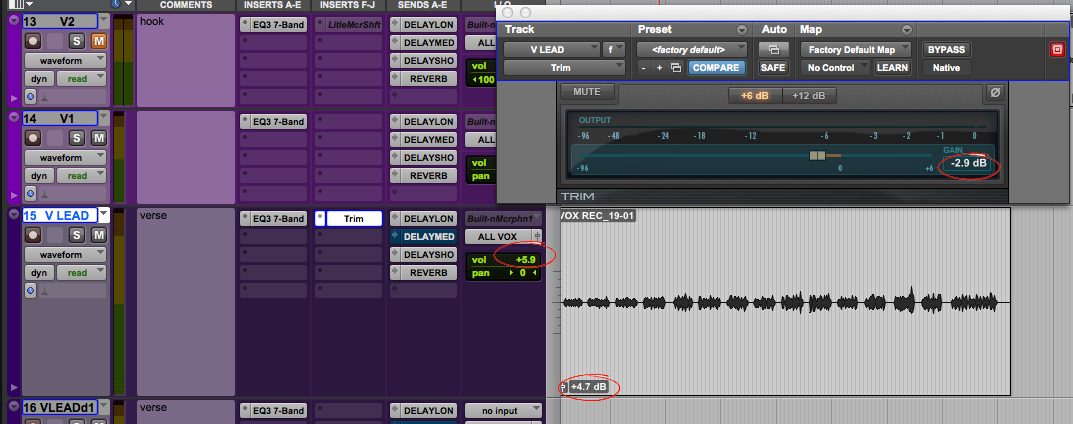
An example of gain staging on a single sound source (vocals). The red circles point out the 3 various gain controls being adjusted within the vocal (clip gain, volume fader, plugin via Pro Tools Trim)
As we can tell – there are three key stages that allow us to control a signal’s gain when mixing in Pro Tools. We can also add more steps if we chose to output this track to a Subgroup, etc. Some DAWs may offer more or less flexibility.
Every audio-passing system (analog or digital) has two extremes. At the quiet end there is the noise floor, which consists of a constant background hiss. It’s not ideal to record sounds too quiet because if/when their volume is increased during mixing and mastering, the noise floor will also increase. This would result in the background hiss becoming more present within your track.
On the loud end there is clipping and distortion that happen as a result of overloading the channel. We wouldn’t want to set our volumes too loud so that our tracks are constantly clipping and creating ugly distortion. That’s equally as bad as it won’t allow us to increase the volume of our track later at the mastering level.
Approaching the gain staging of our track will require finding a middle ground between the two. Enter headroom.
What is headroom?
Say we had an empty glass in front of us with a pitcher of water ready to fill it. There is only so much room for water in that glass – and even though we have a pitcher that can fill multiple glasses, it would be unwise to pour the whole pitcher into it. In fact – we couldn’t. You would eventually fill the glass and then make a mess with the rest of the water as it continues to pour out.
 Filling a glass of water is a good comparison to mixing sound to “fill up” your master bus
The glass is a symbol for the dynamic range of our track. There is only so much volume you can squeeze out of one track. If you go too far, you will exceed the dynamic range of the track and overload it, which will create problems such as clipping and distortion.
Continuing, when we pour ourselves a single glass, we likely wouldn’t fill it right to the brim. We could – but picking it up and drinking it will be a challenge, we may even spill some as we attempt to grab it. So what do we do? We pour enough to leave a bit of room at the top so we can sip our water without making a mess.
That room at the top of the glass is headroom. When you are mixing, you want to preserve some of the dynamic range of your track in order to prevent it from clipping during transients or louder moments that occur throughout the song. Headroom acts as a buffer zone for loud peaks and increases in volume that may occur throughout the performance.
By preserving headroom, you will give yourself and/or the mastering engineer the ability to turn up the mix later during the mastering process. This will be the time when the record comes up in volume to an industry acceptable level.
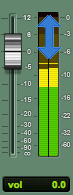 Visual idea of headroom as it appears on a Pro Tools audio track. In the photo of the channel (to the left), there is about -8db of headroom.
How much headroom should I preserve in a mix?
The amount varies depending on the circumstance. A number of factors come into play – such as whether this is during the recording or mixing stage, the quality of the sound source, what are current volume relationships like, etc.
Most engineers aim for at least -6db of headroom on their meters. I am included in this equation; however, every now and then I break and bend the rules. This is strategically as I am mastering most of my own music and understand how far I can push things.
Why is gain staging important?
Gain staging is important because it directly pertains to the volume relationships within our mix. When used effectively, it will avoid increasing the noise floor and keep noise to a minimum. Gain staging will also allow us to maximize the dynamic range of a track while preserving overall headroom in the mix. The combined results will be a clean, balanced and loud mix that bangs.
Is it better to be too loud or too quiet?
This is a challenging one to answer. On the one hand, if something is too quiet and requires that we increase it’s volume during mixing, it will likely introduce some noise.
On the other hand, if we record a source so loud that we are overloading the track and clipping, we will have audio that sounds harsh, ugly and distorted.
The true answer is neither is ideal. However – if I had to pick one, I would rather have my track be too quiet. While it may introduce noise, there are at least ways to reduce it and it won’t be distorting. A track that is distorted is unfixable and has many other issues that come with it.
What happens if I don’t gain stage my tracks accordingly?
Without proper gain staging, we are holding the mix back from sounding as good as it could be. This poses a problem later when it comes to mastering, as we will not be able to turn up a mix that is already too loud, or remove noise that is already present. Furthermore, a song that is gain staged too loud has a tendency to sound weak, thin, flat, distorted and generally unpleasant. Tread carefully.
Conclusion
This lesson was one I learned later in my career and took me awhile to fully understand. In retrospect, strategic gain staging in a mix has taken me farther than compression and other processing. Mastering this part of the process will help you achieve louder and cleaner mixes on your own as well.
I’ll be back with more mixing tips in the near future.
Also Helpful